MACLAREN GRIFFITH
4.3 BV
Well what can you say about this project? This is probably the most famous Griffith in the world, and it’s certainly the only one. For a start it’s a 4.3 Big Valve which makes it super rare before you start as there were only 34 ever made. This particular car was then sent to Maclaren for chassis modifications and suspension changes. Most of the changes were implemented by the factory but not all, as some were considered too expensive or unnecessary. This car was resprayed and re-trimmed just over five years ago and then abandoned in a damp garage and not used or started. Unfortunately the vehicle has suffered very badly, in fact I don’t think I’ve seen anything so bad ever. The mould on the inside was so severe, I had to have it professionally detoxified. I had to wear a mask just to remove the seats. So despite the ruined interior, the rest of it was no better. The powder coating had come off the chassis and suspension, the brakes were scrap and just about everything was corroded, but luckily the engine internals had survived. I put a camera down the bores and checked if there was any corrosion present, but all seemed fine. The vehicle needed a total rebuild for sure, but the owner wanted to do a few changes to the original car. For a start 500 wheels were to be fitted, as it had been modified with a 500 front some years before. The interior obviously needed to be replaced but also the instruments were to be upgraded along with other details.
So the pictures and text tell the story of the rebuild and enhancements, hope you enjoy it.


The interior being professionally cleaned and detoxified. Nearly an inch of mould in some areas.


The new exhaust system. This is a sports system without any cats, should really sound amazing like a precat Griff should sound.

The vehicle being prepared for the removal of the engine. The exhaust system has been removed and all the fluids drained. Just bell housing bolts and engine mounts to be removed, then the engine is ready to be taken out.

The engine being removed from the vehicle using the overhead electric hoist.

The chassis is in a very poor state but once shotblasted and painted should be back to new condition.
500 wheels shotblasted and stove enamelled along with new Toyo Proxes tyres.


And so the engine build gets underway. The crankshaft and pistons are away being balanced and a variety of parts ordered which includes a 218 camshaft. This profile works extremely well on a 4.3 and give very strong mid range torque. Here the block is being degreased before being chemically cleaned. It will then have a couple of modifications, one is a camshaft retaining plate to stop the camshaft moving and the other is a couple holes drilled in the base of the V which aids lubrication of the timing chain and helps to prevent wear.


Here the block is being modified to accept a camshaft retaining plate. This stops the camshaft moving which is what happens on a normal engine. This plate keeps the camshaft perfectly positioned and stops premature chain wear.

The bores have been honed and the engine mounts fitted along with the camshaft and vernier gear.

The picture on the left shows the crankshaft installed in the block, and on the right, the flywheel which has been refaced.


The picture on the left shows the piston assembled ready for installation. The other two photo’s show the the pistons being installed in the block.

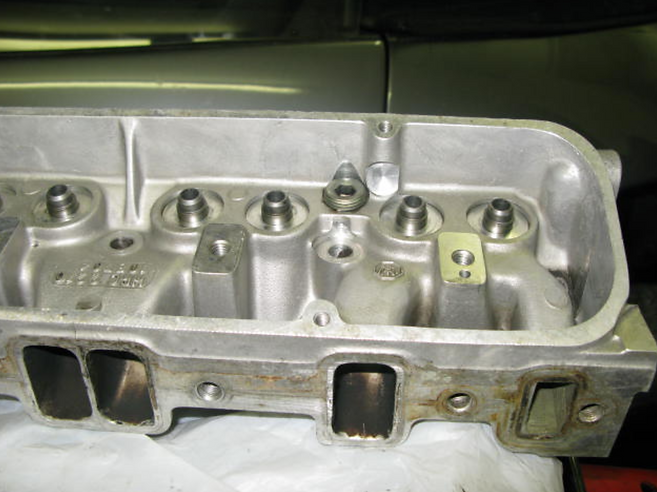
Now here’s a problem! The valve guides currently fitted to the head have no valve stem seals. The new one in the middle is machined to accept a modern seal, so all the valve guides will be changed for the later type. Also the valve seats will be recut to ensure a perfect seal with the valve itself.

Problem resolved. The cylinder heads have had new valve guilds fitted which are machined to accept valve seals. All the valve seats have been recut to ensure perfect concentricity and proper seating when the valves are refitted. It should be a considerable improvement over the original ones.


The picture on the left shows the valves being lapped to the seats so a perfect gas tight seal is achieved. The shot on the right shows the valves being fitted to the head once it has thoroughly de-greased to remove all traces of grinding paste.


The valves have now all been fitted along with the valve springs and of course the all important seals. The heads have now been completely restored to as new condition and are now ready to be fitted to the block.


