FERRARI
DINO 246GT

Well here is Italy’s finest! Very pretty on the outside but alas not quite so good on the inside. While there is nothing catastrophic mechanically, there are numerous problems that need to be addressed. The engine is very difficult to start, and once running misfires heavily. Also the vehicle overheats after a very short driving period and there are lots of electrical gremlins. The vehicle has suffered minimum maintenance over the years and there are many areas that need to be put right. A new alloy radiator is to be made specially for the car to sort the overheating issue along with a new thermostat and water pump.


The project starts off with the removal of the old radiator and draining of the cooling system. Here you can see the engine bay as the engine is started to be dismantled. There are numerous oil leaks from both cam covers and the sump casting all of which needs to attended to. The original ignition system uses points which are notoriously unreliable, so an electronic upgrade will be fitted to make the engine run better and hopefully make starting easier. The three carburettors also need to be balanced and set up properly which will make it run as it should.
One very gorgeous alloy radiator. this has been specially made to the same size as the original one but of modern materials and design. This should help enormously with the cooling issues and help to prevent the overheating problems.


The photo on the left is of the front brake caliper, having tried to remove the pistons for seal replacement. Unfortunately one of the pistons has rusted into the casting and a new caliper will be needed. The other picture shows the original point ignition system which will be changed for an electronic upgrade.

One rather sorry looking engine bay. Most of the alloy parts will be vapour blasted and the steel parts shot blasted and painted. Also a new set of ignition leads will be fitted and new gaskets and seals installed to cure the numerous oil leaks. Most of the nuts and bolts will be replaced with stainless ones to complete the upgrade.


Here I am making some stainless steel water pump studs. The original studs were normal steel ones and had badly corroded to the water pump. So badly in fact, I had to use a slide hammer to remove the old pump. The lower shot shows the newly made items fitted prior to the new pump being fitted. Hopefully this problem wont happen again as all the other bolts have been replaced with stainless items.


Re-chromed oil filler caps, wheel bolts and air filter fasteners, all done in blue chrome, looks superb. The other shots show some of the vapoured alloy engine parts and painted parts.


The carburettors being stripped, cleaned and set up. The shot on the right shows the float heights being correctly set. Interestingly the floats were 10mm too high which may account for the rich running and starting difficulties.


These pictures show the engine now cleaned, new ignition leads and the carbs refitted along with the cam covers secured with new stainless domed nuts. Also the distributor has been rebuilt and new electronic ignition installed. This should help make the engine run much more smoothly.


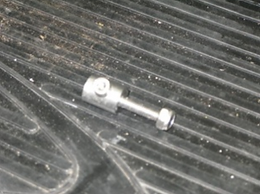
The exhaust should have a stud fitted to it which secures a heat shield the protects an oil pipe but unfortunately it had sheared off. Here you can see a stud like item that I made which repairs the damage without cutting and welding a new one to the exhaust. I was concerned that the exhaust might be damaged if welded and the location of the broken stud made it difficult to access.


These photos show the modified distributor with the electronic pointless conversion. This mod should make the engine run much smoother and make starting easier. Pictures also show the old fuse box and the new gold version. This controls the heavy current from the alternator and needs to be safe and robust. I think it looks very purposeful once installed in the engine bay.

The pipe that runs from each of the fuel tanks has been replaced from an old discoloured plastic item to a new braided stainless steel pipe that runs around the firewall. Although difficult to install, looks so much better than the previous pipework. Finishes off the engine bay and complements all the other work.

Almost finished, just the sump to go on the gearbox, some oil and it’s ready to run. Always a very exciting moment after so much work. Just hope it runs as well as it looks. The carburettors are a little fiddly to set up, but I’m hoping for nice even idle and a much more responsive engine.

Here you can see the vacuum gauges plumbed into the inlet manifold. This allows the carburettors to be balanced against each other so equal amounts of air flows through each one. Once this procedure is complete, the mixtures are then set on each cylinder correctly.


the photo on the left shows the ignition timing being set, and on the right, the mixtures being set up.
The shots below show the finished vehicle gleaming in the sunshine. It might not be the fastest Ferrari but it certainly is one of the prettiest.


